Ever walked around a supermarket and noticed that all their best deals are given prime real estate at the end of the aisle?
That’s because these attractive discounts tempt customers to spend more than they were planning through impulse-driven upsells and cross-sells.
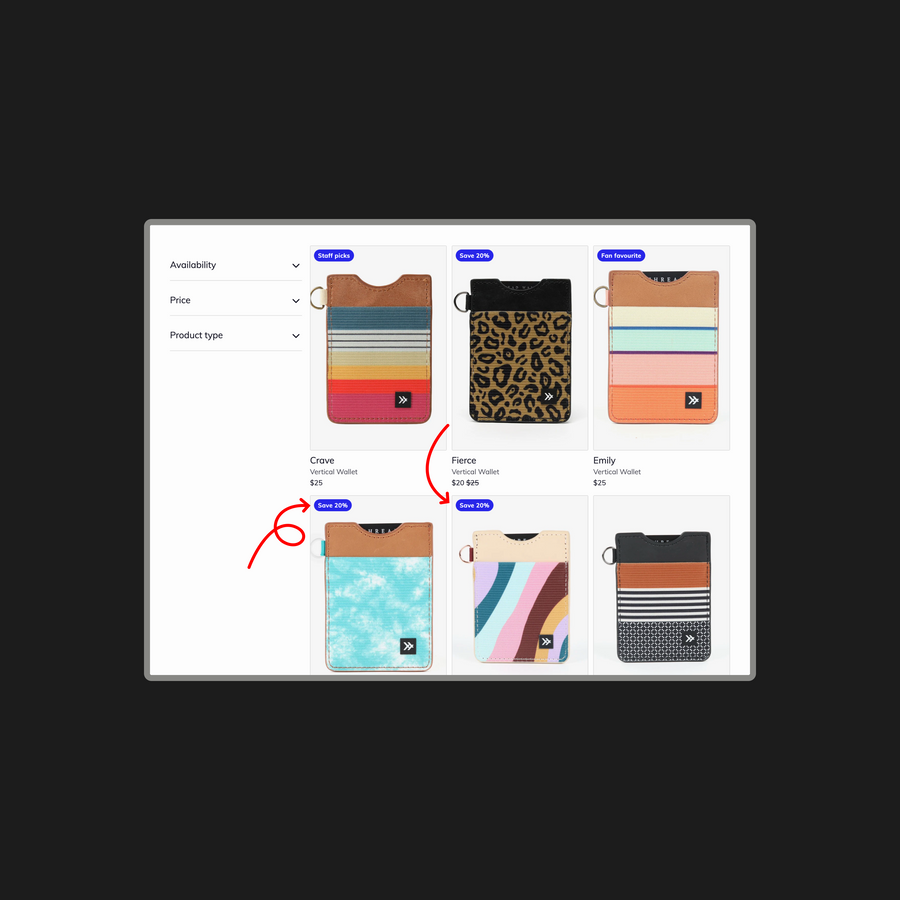
You can leverage this same strategy on your Shopify store by highlighting your top offers through sale tags (also known as product badges and product labels):
Read on to learn about three ways to add sale tags to your store, using:
- Built-in theme badges
- Manual badges
- Dedicated apps
Let’s get into it…

Using Built-In Theme Badges
Introduction To Built-In Theme Badges
Built-in theme badges are exactly what they sound like: sale tags that are included as standard in your Shopify theme. Many themes have basic functionality to support this. Here’s an example built with Brickspace Lab’s Paper theme:

How To Enable Built-In Theme Badges
Let’s walk you through the process of setting up and editing built-in sale badges using the Paper theme. This process will differ depending on which theme you’ve chosen — so if you’re not using Paper, you should reference your theme’s support docs.
Set Up Theme Badges
Add a sale badge to your theme by following these simple steps:
- Open the product you’d like to update in Shopify.
- Scroll down to Tags.
- Enter “badge_Your badge text”, where the words “your badge text” can be replaced with your desired sales badge copy (e.g. “badge_On Sale Now”).
- Click Save.
You can also update tags via third-party apps, Shopify’s bulk editor, or the csv product import feature.
Edit Built-In Theme Badges
If the default built-in badge isn’t a good visual match for your store’s branding, you can make basic edits to the appearance as follows:
1) Log in to your Shopify dashboard and navigate to Online store > Themes.


4) Under Badge color, set your desired sale badge color. Bear in mind this change will be applied globally, not just to a single sale badge.
Pros and Cons of Built-In Theme Badges
Pros:
- Quick and easy to set up
- Seamless integration with your chosen Shopify theme
- No additional cost
Cons:
- Limited customization options
- Not available in all themes
- May not meet specific branding needs
Adding Manual Badges
Introduction To Manual Badges
Looking for a more flexible, customizable option than Shopify’s built-in sale tag?
If you’re comfortable with a little coding (or are prepared to learn), you can create product badges manually. Sure, it’s more labor-intensive than using Shopify’s automated tags. But on the plus side, you get total freedom over the appearance of your tag — if you can imagine it, you can code it.
How To Add Manual Badges
It’s possible to edit any Shopify theme using Liquid, the platform’s coding language.
Don’t worry if you’re not the next Steve Wozniak because we’ll hold your hand through the process of editing your Liquid code to implement your manual sale badge…
Duplicate Your Theme
First, you’ll want to duplicate your Shopify theme. Make the changes to the duplicated version of your theme — that way, if anything goes wrong, you won’t have broken your entire store.
Follow these steps to duplicate your theme:
1) From your Shopify dashboard, navigate to Online Store > Themes.

2) Find your current theme, click the three dots menu, and choose Duplicate.

Choose Your Sales Items
You only want your sale tag to appear on products that are actually on sale.
There are multiple ways to list on-sale items, such as creating a dedicated Shopify collection for sale products. But we’re going to show you how to do it by creating a “sale” product tag in Shopify and applying it to your sale products. Here’s how:
1) From your Shopify dashboard, click Products in the left-hand menu.

2) Check the boxes next to all the products you want to tag.

3) Click the three dots button and choose Add tags.
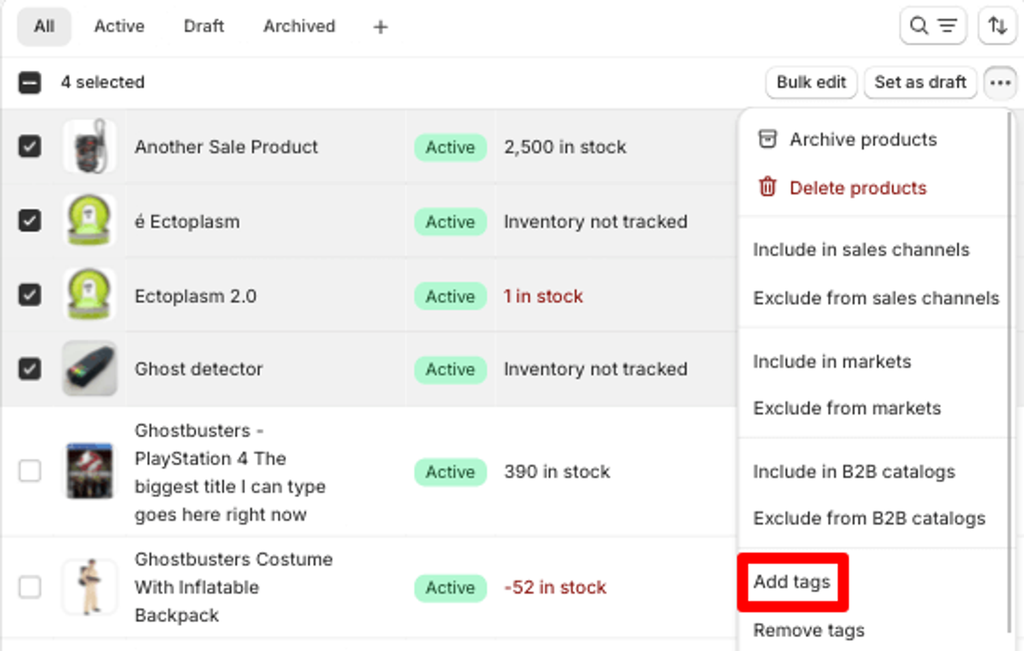
4) Type the name of your new tag in the text box (e.g. “sale”) and click Add.

5) Click Save.
Edit Liquid Code
Okay, now you’ve backed up your theme and tagged your sale products, it’s time to edit your Liquid code so your sale tag shows up on your store. For a full walk-through on how to do this, check out the following guide: How To Add and Customize Product Labels & Badges On Shopify.
Pros and Cons of Manual Badges
Pros:
- High level of customization
- Flexibility in design and placement
- Can be used with any theme
Cons:
- Time-consuming to create and implement
- Requires some technical knowledge
- May be hard to maintain consistency across your store
Using a Shopify App for Sale Tags
Introduction To Shopify Apps for Sale Tags
Want the flexibility of a manual sale tag without all the hassle of playing around with your theme code? The good news is you can do this using a dedicated Shopify app.
Here are some of the top options:
| App | Shopify Rating | Pricing |
|---|---|---|
| Flair | 5/5 (300 reviews) | $29 – $99 per month (free trial available) |
| Labeler | 4.7/5 (78 reviews) | $0 – $5.99 per month |
| Elegantsy | 4.4/5 (58 reviews) | $6.99 per month (free trial available) |
| Badgy | 4/5 (28 reviews) | $7.99 per month (free trial available) |
| InstaBadge | 3.9/5 (84 reviews) | $0 – $14.99 per month |
As you can see, none of them will break the bank, and all allow you to create highly customizable sale tags (although, naturally, the higher-priced options offer additional features that might be useful for some stores).
But before choosing an app, bear the following considerations in mind:
- Does it work with your Shopify theme?
- What do existing/previous users say about the app’s performance?
- Have reviewers praised the app developer’s customer service?
- Does it offer a free plan or free trial so you can try before you buy?
How To Use a Shopify App To Add Sale Tags
When you’ve picked out a product badge app, the next step is to add it to your store. This is a simple process: just click Install on the relevant Shopify app store page, then follow the on-screen prompts to set everything up.
Now, you can start creating custom badges that perfectly match your store’s branding.
Naturally, the specific steps will vary based on which app you choose, but all the apps in the above table are pretty user-friendly. And you won’t need to learn how to code!
Pros and Cons of Using an App
Pros:
- Wide range of customization options
- Additional features (e.g., automation, analytics)
- Easy to update and maintain
Cons:
- Additional cost
- Dependency on third-party developers
- Potential for app conflicts with other store functionalities
Conclusion: Which Option Is Right for You?
So, you’ve got three ways to add sale tags to your discounted products. You can:
- Use Shopify’s built-in tags
- Create manual tags by editing your theme’s Liquid code
- Use a dedicated product badge app.
But which option is right for your store?
If you’re new to running a Shopify store and aren’t super familiar with Liquid code, or if budget is a big concern, your best bet is to stick with Shopify’s built-in tags. Sure, they’re pretty limited, but they’ll get the job done — and they’re free.
Alternatively, if you know Liquid like the back of your hand, you can do it all yourself by creating manual product badges. They’re free and highly customizable (provided you possess the necessary coding skills).
For everyone else, we recommend using a dedicated app. There are affordable options to suit all types of stores, and they’re the easiest way to create badges that match your store’s branding.
Still not sure? Don’t be afraid to experiment to see what works best for your specific needs.
Just remember to back up your theme before editing your Liquid code!

Building Shopify apps @BurstCommerce